

With many teachers and students being thrown into distance learning, SeeSaw™ has become a popular learning platform to connect teachers, students and parents. It provides the opportunity for students to show learning through interactive multimedia options while keeping parents connected and involved in the process as well.
While this app is mostly geared towards the general education classroom, there are many thoughtful and innovative ways to use SeeSaw™ with your music students! This blog will cover some musical ideas to use the drop and drop feature.
Drag and Drop – The Basics
One of my favorite aspects of the SeeSaw™ app is its interactive interface. Being able to drag and drop objects on a template provides great opportunities for your students to demonstrate their music knowledge. While this feature works best on a hand-held device, your students on a laptop, computer or Chromebook can still utilize it. With this feature, your students can place notes on the staff, rhythms on the beat, symbols on music, labels on instruments and much more.
How to Make a Template
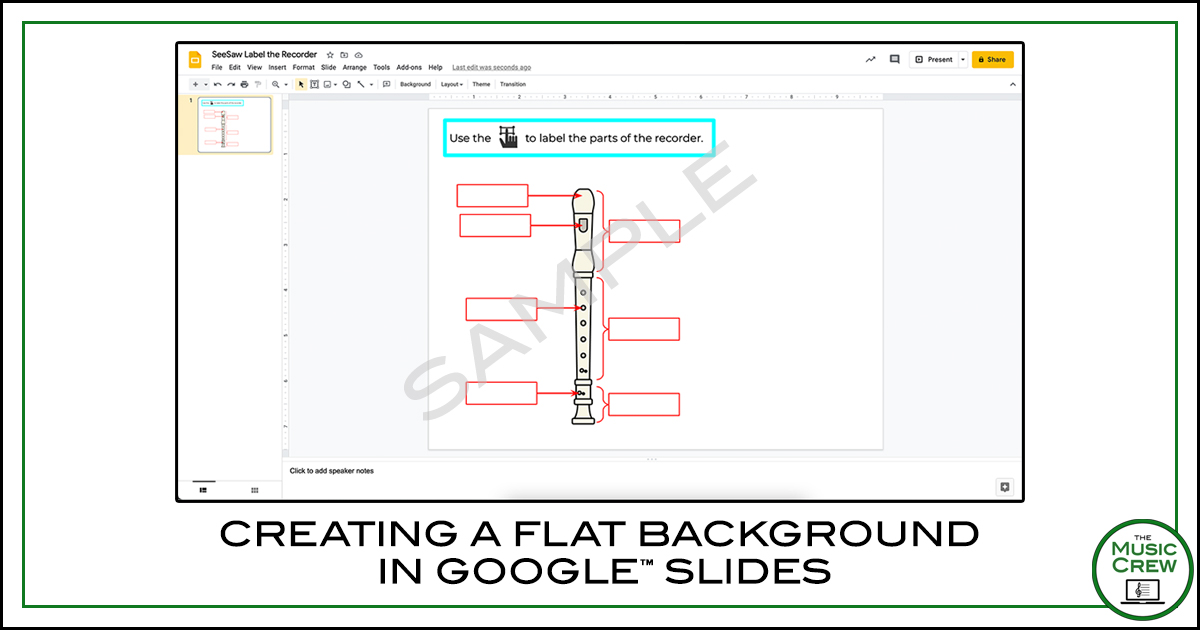
Because your students can move, erase or resize everything you put into your templates, it’s best to make a flat background of all your stationary objects. Anything that doesn’t need to move for the lesson will go into this flat background.
1. Create a blank Google™ Slide and place all your stationary objects on the page. For example, if you want your students to label the parts of the recorder, place your recorder clipart or picture and make lines, boxes and arrows with the drawing tool. (See picture 1.) Do not put the labels on this template. Do include your directions here if possible!
2. Download this slide as a JPG (File->Download->JPEG Image). This image that has been downloaded to your computer can now be inserted into your SeeSaw activity.
3. In SeeSaw™, create a new activity in your Activity Library.
4. Once you have filled in the activity name and directions, click on Add Template for Student Responses. (See Pic 2.)
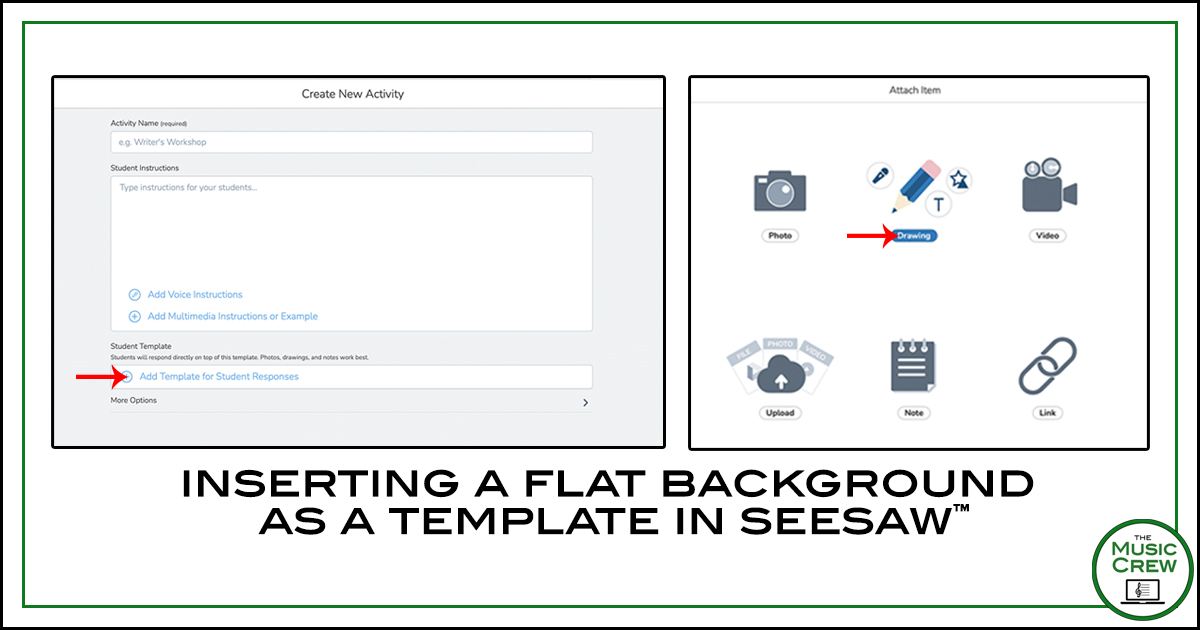
5. Select the Draw option. (See Pic 2.)
6. Click on the camera icon and select Upload. (See Pic 3.) Select the picture that you downloaded earlier.

7. Resize as needed. Having some blank space is okay. (See Pic 3.)
8. Click the three dots on the edge of the image and lock it into place. (See Pic 3.) Your students will still be able to unlock it and move it, resize it, or even erase it if they know how or do so by accident. Unfortunately, there is no workaround.
Movable Pieces
Once your background is in place, you can create your labels. While many teachers might like the students to volunteer this information by typing it in without prompt, I like to provide the information in preliminary lessons.
You can create your labels a couple different ways. While you can create them outside of SeeSaw™ and insert them just like your background (unlocked), the easiest way in this example is to create them by using the typing tool in your template.
1. Click the Typing tool. (See Pic 4.)

2. Select the font and style you prefer and type in your label name. In this case, I typed in “headjoint” for one of the instrument parts.
3. Repeat for each label and resize as needed. Do not lock any of them.
4. Arrange them on the side and mix them up if you prefer.
5. Click the green checkmark at the top right to save your template. Review your directions, title and don’t forget to click SAVE at the bottom.
Congratulations, you’ve created a drag and drop activity with movable objects!
Tips and Tricks
While your background image can usually be a JPG, your movable pieces need to be transparent PNGs. If you choose to create small images outside of SeeSaw™, choose PNG so that your image does not have white around it. This is especially helpful for rhythms and note notes for the staff.
Also, as I mentioned before, your students can (and will) unlock, move and/or resize your background or movable pieces. This is usually done by accident and can’t be avoided with the current features. Make sure they are familiar with the undo button! Creating all your unmovable images as a flat image will help minimize this issue.
Are you worried that your activity doesn’t make sense or won’t look right? You can create a Practice Class and assign your activities to yourself to test them out! To do this, click on your master list of classes and click “+Create New Class” and name it “My Practice Class” or something similar. You can then see your activity as your students do!
Have you seen directions with the icons instead of words? Need a key to all the icons? Click here. In the directions, typing :check: will show up as the green checkmark. If you’d like to use an icon in your Google Slides background like my example, take a screenshot in the menu linked above!
Getting Creative
While I’ve only covered one example, there are lots more ways to use them in your music lessons! Some more ideas:
- Drag notes onto the music staff.
- Label the keys of a piano.
- Drag the correct rhythms to represent a motive. (Bonus: use the microphone to record your voice or clapping hands and have them drag and drop to dictate!)
- Compose on the staff or with rhythm icons.
- Sort instruments into families.
- Sort or match clipart or symbols to the tempos, dynamics, etc.
- Drag the instrument to the sound clip.
- Sort handsigns to form a scale in the proper order.
What are your ideas for a musical drag and drop lesson? Share in the comments!