Taking Popsicle Stick Dictation to the Next Level
Rhythm is a fundamental skill for the students in your classroom. Being able to read, write, compose and improvise can be challenging, especially to your younger students, so here’s a guide to making hands-on rhythm toolboxes your students will love!
Why?
The young music makers in your classroom all have different learning styles, whether it’s aural, visual or kinesthetic. Using hands-on manipulatives strengthens your lessons by providing the opportunity to see, touch, move, feel and experience rhythm. You may already have popsicle sticks for rhythm dictation but read on to upgrade your materials for all your rhythm lessons!
Gather your Materials
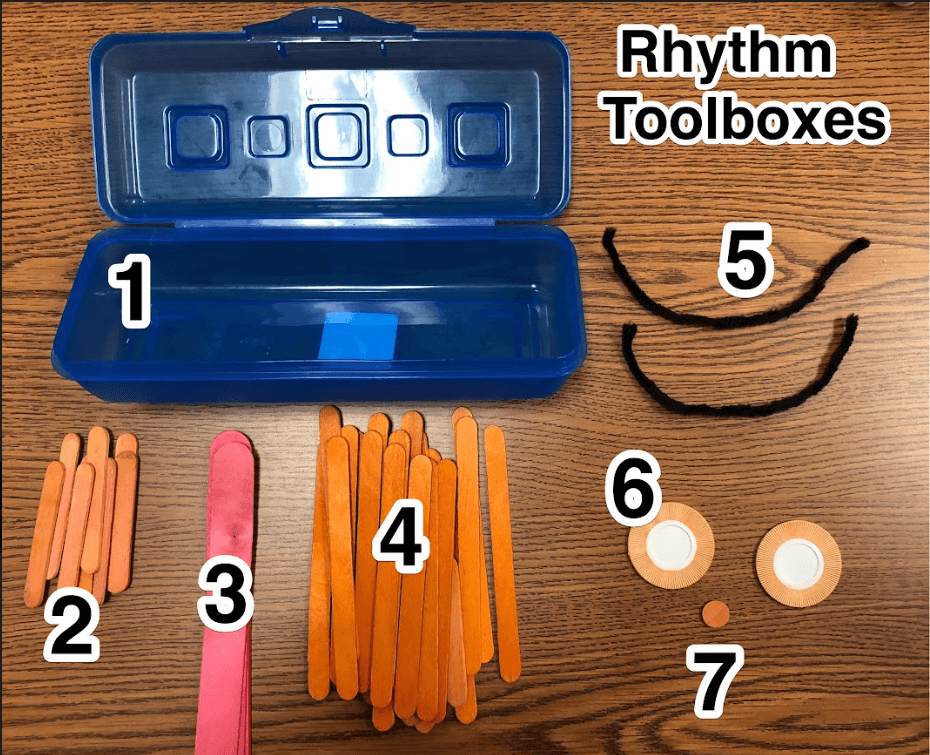
While it is not necessary to have the exact materials shown, my toolboxes include:
- a sturdy container
- 10-12 mini popsicle sticks
- 4 jumbo-sized popsicle sticks, preferably in red
- 24+ regular popsicle sticks (depending on known or desired rhythms)
- 2 black pipe cleaners
- 2 poker chips
- 2-4 small craft circles
The Breakdown
Containers: While a sturdy container is not required, I find that it saves a lot of time and frustrations. A plastic baggie works fine and is an economical choice upfront, but my kids often don’t know how to zip them properly or will not secure them when they do. They also tear easily, needing to be replaced. However, they do store a lot flatter! If you go with plastic baggies, try to get the easy to zip kind. You can also find strong poly envelopes which are quite affordable! If you do choose to invest in hardcase containers, your local dollar store often has containers that are perfect for this. My containers were ordered in bulk many years ago and while I can’t find the link to the store I used, they can be found here. The kids get very excited to open up their containers and see what’s inside!
Popsicle Sticks: Many years ago, I started using pre colored sticks bought in bulk so that I can easily group kids for reading. Saying “Yellow sticks, read your rhythm” or “Blue sticks, clap your rhythm” is a quick way to group readers without complicated rules. While the regular sticks are easy to find in colors, the mini sticks are a little more difficult to find in bulk. For these, I had to experiment a bit with dying the natural sticks. I used food coloring, sugar free kool aid packets and fabric dyes. You can find helpful directions here. While this step is a bit tedious, the payoff is a lot of fun! You could also spray paint them or use markers as well. I do not use the red sticks in the previous mentioned sizes! However, the jumbo popsicle sticks in my boxes are always red (keep reading to find out why) and again, I dyed them myself. You can find them in packs of other colors though.I prefer using the jumbo size to separate them from the others.
Pipe Cleaners: Cut black pipe cleaners down to 3-4”. You can get quite a bit out of a small pack from the craft or dollar store.
Poker Chips: I found mine in the dollar aisle of my local Target many years ago, but they can be ordered from Amazon or similar. I used a Sharpie in coordinating colors to mark on the outer circle. If you can’t find any poker chips, you could also just use wooden craft circles or even laminated print outs. Again, color the outer edge only.
Small craft circles: As someone with far too many random crafting supplies just sitting around, I found these little wooden circles in my personal craft stash and threw them in with the popsicle sticks when I was dying them. You can find them at craft stores or use little craft beads or sequins, etc.
How are these materials used?
While many of these supplies are obvious and familiar, you might be wondering how some of them are used!
It is important to me that my students understand how rhythm and beat work together to form music. The red jumbo sticks are for this purpose. I use them as beat bars and they appear frequently in my teaching visuals, so it is not a new concept for my kids. Using my document camera or a similar visual on the projector, I show the kids how to lay out their red sticks and we practice pointing to the beat. You can have them say “Beat beat beat beat” while tracking with their finger. I tell them that these don’t move, even when we start over to make a new rhythm.
The regular size popsicle sticks are used for the stem or stick of the rhythm. I like to use the smaller popsicle sticks for beams, flags, and rests. It’s not required to have the smaller size, but it does make a good differentiation between the different parts of a note and helps fit more complicated rhythms like eighth/sixteenth combos over the beat bar. (However, using the regular sticks are easier when you make sixteenth notes beams.)
The pipe cleaners are ties and the poker chips are noteheads for the half note, dotted half note or a whole note on its own. The small circles work great for dotted notes.
Lesson Ideas
Imitation: When your students are just learning the basics or even adding on a new rhythm to their known skills, don’t feel like you have to jump straight into dictation. Having them practice forming one note at a time and then copying your 4-beat example on the board is great practice. Each time they copy and form a rhythm, make sure they read it and track it with their finger or with an extra popsicle stick as a pointer.
Dictation: Once they are comfortable with rhythm reading and building their rhythms, start with simple dictation examples. Say a rhythm in your chosen rhythm system out loud, without providing a complete visual. Instead, put your blank beat bars on the board and point to them as you say your rhythm with your chosen system. Work your way up to tapping a rhythm over the beat bars with a mallet or pointer. If you find that students struggle with this step, walk to them and point at their beat bars in front of them.
Eventually, you can play it on an unpitched percussion instrument with no visuals for a challenge.
If they are struggling, have them track their beat bars silently while you read it or play it out loud for them. Say or play the example at least three times so they can check and fix their answer if necessary. If you are clapping or tapping an instrument without visual support on the board, you can move your hands from the right to the left (mirroring) to show the progression of the rhythm.
Composition: Give them the freedom to make their own rhythms! You can set parameters (“use quarter and eighth notes only”) or you can allow them to choose from all known rhythms. Let them play it on an unpitched percussion instrument or assignment body percussion/movement to it. Allow them to say it to a partner or the class. Check for understanding that only one quarter note can be used per beat or that a half note has an empty beat besides it, etc.
Improvisation: Ask them to place a quarter note onto their 4th beat bar (or a set of 16th notes in beat 2, etc.), but leave the others blank. Pair them up or call on volunteers to make up a rhythm that fills in the rest, without actually building the rhythm. Ask them to improvise an additional 4- beats after the ones they’ve already built. They can also build a complete rhythm and use a xylophone to improvise a melody to match their rhythm!
Special NotesDon’t forget to make yourself a box for demonstration purposes. Since these can be difficult to fit underneath the document camera, you can either project a digital version or add magnet tape to the back of your sticks and accessories to place them on the board. The kids love coming up and using your sticks to show their answer to the class!
Also, have the kids take a look at the materials and tell you how they think they might be used! How would we use these items to build a half note? Is there something in this box to show two rhythms that have combined sounds to make one longer sound? Can we build rests in different ways? (A “Z” works great or you can get fancy and use the smaller sticks to form the full rest without the curves!)
These make great last-second centers for composition or can be paired with task cards for independent practice.